pinterest.com

Showing posts with label Pattern. Show all posts

4.25.2017

Baby Quilt For Ida


Back when I made Cora's quilt, I bought enough gradient fabric and backing fabric to make two quilts.  I'd always planned on making one to coordinate with hers and was hoping that it would be for a sibling.  When I found out I was pregnant with Ida, the intention was to make this so she could join it through out the Winter while she was a baby.  Instead, I spent my free time making some quilts for gifts and packing for our move.  When Spring arrived, all the urgent stuff on my to-do list was finished and I finally got some time to work on Ida's quilt.  I'm not sure if I didn't order enough of the gradient quilt or I couldn't find it all, but I ended up having to add some other fabric in.  I had this black fabric and some gray fabric with white triangles that fit in perfectly.  It only took me about half a day to finish the front (this included cutting, pinning, ironing, sewing, and watching two children).


I let it sit for a couple days until I could buy some new batting... then I quilted the piece in an evening.  I was almost finished quilting and I broke my last needle. Not having a needle pushed me off schedule for a little bit, but it gave me some time to work on some other projects.


While I took a little break, I tried to figure out what kind of binding I wanted to use.  I was torn between using the same African wax print fabric that I used for Cora's and this floral fabric that I fell in love with right before I found out I was pregnant.  I even shared my issue with Facebook and Instagram. Everyone brought up great points, but I ended up letting Cora pick and we went with the African wax print.

I made the binding and sewed it all up one evening when Cora was at the grandparent's house.  It was fun to have Ida sitting right there while I was finishing up her quilt (something I never did with Cora's).  She was immediately in love with it and kept making excited noises whenever I let her cuddle with it. There were a couple spots that needed some repair after I washed it, so I just did a visible stitch and love that it adds a little more texture.  


Ida is pretty quiet, but the moment I gave her the finished quilt, she was squawking and squealing and so happy to have it.  I can't wait to see her wrapped up in this quilt in the the coming years.


To see more of my quilts, check out my first quilt (Cora's) here and two coordinating quilts that I made for my nephew and my friend's son here.

10.28.2013

Baby Quilt

I mentioned this tutorial in my nursery inspiration and knew I would make it as soon as I saw it.  I purchased the fabric that Caroline suggested in her tutorial and made the front of the quilt.  I separated the squares into four different shades instead of three like she suggested in the tutorial.  I also decided I wanted my final quilt to be around 40" x 50" ish so I cut 64 squares knowing I'd only needed 63 of them in the end.  I finished up the front about a week before Cora was born.
For backing fabric, I wanted color and pattern so I decided on this fabric from Spoonflower.  I procrastinated a couple months before I basted the quilt, but it was easier than I thought it would be.  I read through a bunch of different random sites for tips to baste.  Here is a pretty good resource that is pretty similar to what I did except a couple differences...  Instead of taping to a hard surface, I used a straight pin and pinned it to the carpet.  I also just used regular safety pins.
Using some of my African fabric, I followed this binding tutorial.  I cut my fabric strips about four inches wide, so that after all of the folding, they would be about one inch wide on the finished quilt.  I wasn't very precise with my cutting because I knew I could make binding consistent with the folding/ironing.  A day or two later I added on the binding.
Here is the final quilt:


This project was surprisingly easier than I thought it would be.  The big hold up was just procrastination and thinking that it would be more difficult and time consuming than it actually was. That being said, I will probably never even attempt a full size quilt.  This was the perfect size quilt to work on without it being overwhelming.  And because everyone likes a picture of a cuddly baby...


2.08.2013

Woodgrain Inspiration

I have always had this love for patterns in nature (see Honecomb inspiration).  My senior year of art, my theme was patterns in nature.  Looking back, I feel like I just skimmed the surface and it is something that I want to look more into and have that translate into some home decor and art.

After a little research, I learned this is called faux bois (french for false wood).  Faux bois is the artistic imitation of wood or wood grains in various media.

Here are a couple home decor pieces:
Pinned Image
Woodgrain quilting
mld104736 0509 drawers fish l 12 Woodgrain Projects   DIY Faux Bois
Martha Stewart Faux-Bois Dresser
Woodgrain wallpaper by Brett Design
Velvet Burnout
And some handmade products:
faux bois vases cg
DIY Faux Bois vase by Centsational Girl
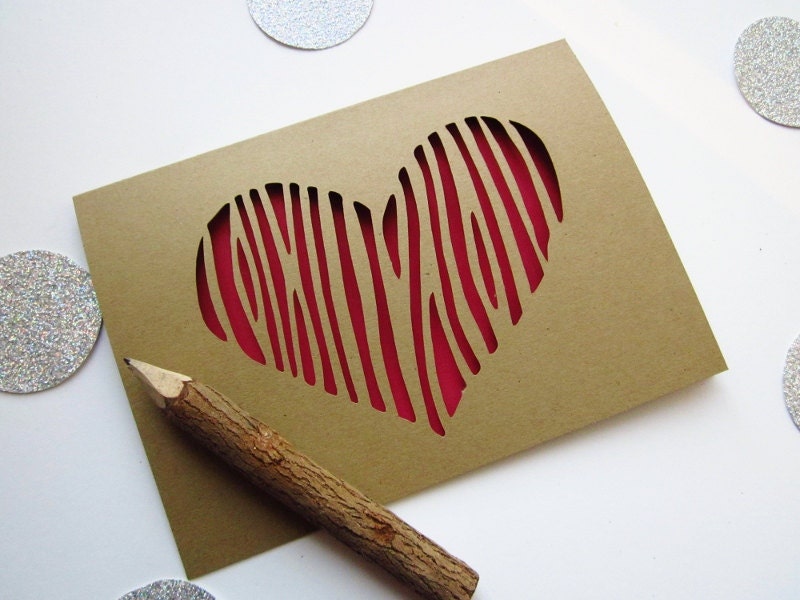
Red Woodgrain Heart Card - Paper Cut Valentine
Woodgrain paper cut Valentine by AshleyPahl on Etsy
Pinned Image
Woodgrain Hoop by Megan Van Sipe @ Lilac Saloon
What do you think?  Have you ever heard of faux bois before?

Sidenote: My computer is so close to being fixed so I will finally be able to get some more pictures up of projects and some other stuff instead of just inspiration pieces.  I can't wait!  There is something about using your own computer that feels so comfortable and I miss it.

1.08.2013

Just Another DIY Infinity Scarf Tutorial

This Christmas was a semi-DIY Christmas for me.  I made these infinity scarves for my mom, sister, and a couple of friends.  I had been thinking about trying to make some infinity scarves for a while, but Christmas gave me the motivation I needed.  I found some great posts that helped with my research including here, here, and here.  Ultimately, I made up my own process when making my scarves (especially with the closure of the tube).

I bought some fabric that coordinates with some of my African fabric (can you tell I'm obsessed with this fabric?!) so the scarves weren't completely overwhelming with pattern.  The first scarf took me about 1.5 hours and the final scarf took me about 20 minutes.  So there is definitely a learning curve... that and I spent a lot of time trying to figure out how to make it all one finished tube for a majority of that 1.5 hours.  Here we go...

1. cut fabric about 2 yards long and about 10-12" wide (I held up one of my favorite scarfs for width reference).
2. iron out.

3. sew lengths together.  You should have one long tube at this point.
4. flip tube right side out
this is where it gets tricky and using two different colors/pattern really helped out...
5. pin two sides together right next to each other (i.e. color to color) and sew.  continue to sew onto the other panels (pattern) until you are unable to flip it inside out.
color panels are pinned together and I started sewing around the seam
6. flip everything right side out and sew up the hole (always ended up being about 3-5").
the binder clip is just to hold the crease tight while sewing
Here are the final scarves (4):
I also love how you can have as much or as little of the pattern and/or color showing as you want depending on how you arrange it. 

10.15.2012

The Heart Finds Peace II

I loved my Here the Heart Finds Peace painting so much, that I decided to make my sister one.  I used the same colors we used in her giant three part painting we did a couple weeks ago.
I started out with a plain chevron pattern similar to the underlying pattern in my inspiration fabric (fabric also from Burkina Faso, Africa).  Next, I painted this gold arrow/chevron pattern on top.  Both patterns are so easy to do and the layering effect looks great.  Finally, I used a navy color to stencil in the words. 
Here is the end result:
 And both of them next to each other:

Related Posts Plugin for WordPress, Blogger...